BLOG
Tutorial: Using Mock Data in React Projects for Designers

As a senior designer at Very, I’m always looking for ways to make the most of the time that I have on any given project, and one of the ways I do that is by designing apps in code and using mock API calls to fill up data-rich applications. In this post, I’ll share how I did this on a recent project, and why it’s such a big time-saver.
Recently, I was designing a dashboard application for a client that included numerous data grids and lists and required large amounts of data to populate those lists. After completing initial wireframes and designs in Sketch for a few of the dashboard screens, I got approval and was ready to move forward with the other screens.
Since most of the screens followed the same design and layout as the initial designs, I decided that designing the rest of the app in code would make it easier to update, add fields, change data, etc.
And the big bonus is that once approved, that was it. No having to translate designs to the front end and go back and forth updating numerous Sketch artboards when any changes came down the line.
Since there were a handful of different groups of information I needed to display (i.e. customers, machines, users, etc.) that would be used in multiple places across the site, I decided to incorporate mock API calls so that any updates to the data wouldn’t force me to make a lot of tedious updates throughout the site.
Also, using mock API calls makes it very easy for developers to get in and update the components to swap in live data for the mock data.
I’ll be walking through how to set up a React environment to use mock API calls, generate hundreds or thousands of records into a JSON object that the mock API will access, and display that information in a material data grid on the front end.
Here’s What We’ll Be Using:
- React (Gatsby)
- Axios mock adapter
- Mockaroo
- Material Table
First off, for this tutorial I set up a clean instance of React using Gatsby. For detailed instructions on how to set up an instance of React with Gatsby, check out the Gatsby tutorials. You don’t need to use Gatsby if you have a React site already built, or have another method you like to use to spin up a React app.
Once you have a React app up and running, we need to install a couple of packages. First, let’s add Axios, which will allow us to make the mock API calls.
npm install axios-mock-adapter --save-devThen, let’s add in Material Tables. This isn’t necessary to use mock data, but will make it very easy to display the mock data with almost no extra work. I ended up using it in the project and it’s very customizable and powerful.
npm install material-table --saveMaterial Tables requires some Material Core elements to work, so let’s add those as well.
npm install @material-ui/core --savenpm install @material-ui/icons --save With Gatsby, our index.js file under src/pages is pretty bare.
import React from "react"export default () => <div>Hello world!</div>Let’s start by adding a Material Table with just a couple of rows of sample data. First, Material Tables needs some icons imported to look okay. Add the following under your React import:
import AddBox from "@material-ui/icons/AddBox";
import ArrowDownward from "@material-ui/icons/ArrowDownward";
import Check from "@material-ui/icons/Check";
import ChevronLeft from "@material-ui/icons/ChevronLeft";
import ChevronRight from "@material-ui/icons/ChevronRight";
import Clear from "@material-ui/icons/Clear";
import DeleteOutline from "@material-ui/icons/DeleteOutline";
import Edit from "@material-ui/icons/Edit";
import FilterList from "@material-ui/icons/FilterList";
import FirstPage from "@material-ui/icons/FirstPage";
import LastPage from "@material-ui/icons/LastPage";
import Remove from "@material-ui/icons/Remove";
import SaveAlt from "@material-ui/icons/SaveAlt";
import Search from "@material-ui/icons/Search";
import ViewColumn from "@material-ui/icons/ViewColumn";
const tableIcons = {
  Add: forwardRef((props, ref) => <AddBox {...props} ref={ref} />),
  Check: forwardRef((props, ref) => <Check {...props} ref={ref} />),
  Clear: forwardRef((props, ref) => <Clear {...props} ref={ref} />),
  Delete: forwardRef((props, ref) => <DeleteOutline {...props} ref={ref} />),
  DetailPanel: forwardRef((props, ref) => (
    <ChevronRight {...props} ref={ref} />
  )),
  Edit: forwardRef((props, ref) => <Edit {...props} ref={ref} />),
  Export: forwardRef((props, ref) => <SaveAlt {...props} ref={ref} />),
  Filter: forwardRef((props, ref) => <FilterList {...props} ref={ref} />),
  FirstPage: forwardRef((props, ref) => <FirstPage {...props} ref={ref} />),
  LastPage: forwardRef((props, ref) => <LastPage {...props} ref={ref} />),
  NextPage: forwardRef((props, ref) => <ChevronRight {...props} ref={ref} />),
  PreviousPage: forwardRef((props, ref) => (
    <ChevronLeft {...props} ref={ref} />
  )),
  ResetSearch: forwardRef((props, ref) => <Clear {...props} ref={ref} />),
  Search: forwardRef((props, ref) => <Search {...props} ref={ref} />),
  SortArrow: forwardRef((props, ref) => <ArrowDownward {...props} ref={ref} />),
  ThirdStateCheck: forwardRef((props, ref) => <Remove {...props} ref={ref} />),
  ViewColumn: forwardRef((props, ref) => <ViewColumn {...props} ref={ref} />),
};
We’ll also need to add ‘forwardRef’ to the React imports.
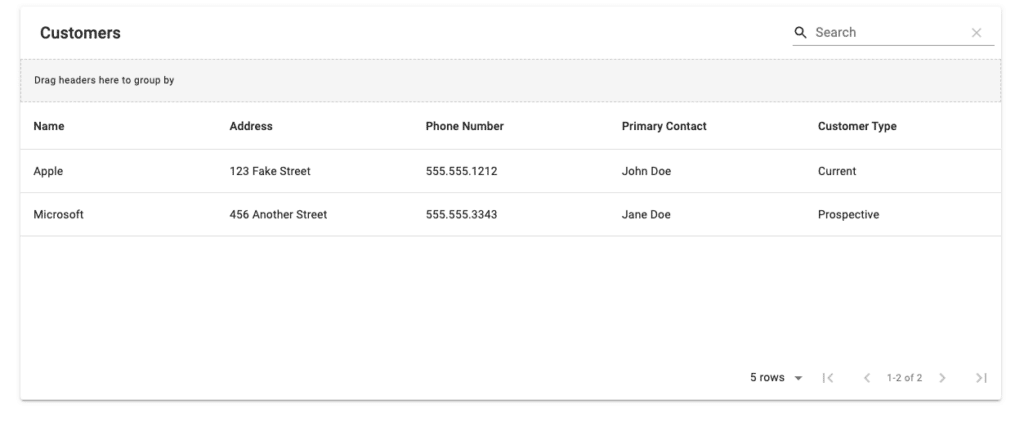
import React, {forwardRef} from "react" Now, we’re all set to add in the Material Table. Let’s add a function to the screen and change the export to use that function. I’ve added a bit of styling to give a width to the table. Let’s use customers as a good example of a list we can use.
function Customers(){
    return(
        <div style=><MaterialTable style=
            icons={tableIcons} title="Customers"
            columns={[
                { title: 'Name', field: 'name' },
                { title: 'Address', field: 'address' },
                { title: 'Phone Number', field: 'phone' },
                { title: 'Primary Contact', field: 'contact' },
                { title: 'Customer Type', field: 'type' },]}
            data={[
                { name: "Apple", address: "123 Fake Street", phone: "555.555.1212", contact: "John Doe", type: "Current" },
                { name: "Microsoft", address: "456 Another Street", phone: "555.555.3343", contact: "Jane Doe", type: "Prospective" },
            ]}
                options=""/>
        </div>
    )}
export default Customers
Once you’ve completed this, you should now be able to see a Material Table with two records available running in your application.
With our table in place, the next step is to use Axios API calls to get our rows, rather than have the information live on this screen. First, create a folder inside your src folder called “utils” and add two files called “axios.js” and “mock.js”. We’ll use these files to make creating Axios calls easier.
axios.js:
import axios from 'axios';const instance = axios.create();export default instance;mock.js:
import AxiosMockAdapter from 'axios-mock-adapter';import axios from './axios';const instance = new AxiosMockAdapter(axios, { delayResponse: 0 });export default instance;Let’s create another folder inside the src folder called “mock”, and add two files inside it: customerMock.js and index.js. This is where our mock data will live. It will also be where we set the URL for the mock API call.
document.addEventListener("DOMContentLoaded", () => { function adjustBotOffset() { // Query Elements const lastBox = document.querySelector(".appPgTimeline-story:last-child"); const downOffset = document.querySelector( ".appPgTimeline-story:last-child::after" ); const timeLn = document.querySelector(".appPgTimeline"); const styleTag = document.createElement("style"); // Create style tag timeLn.appendChild(styleTag); // Set offset css const stylesAdjustments = ` .appPgTimeline-story:last-child::after { height: ${lastBox.clientHeight + 30}px; }`; // Write styles document.querySelector( ".appPgTimeline style" ).textContent = stylesAdjustments; } adjustBotOffset(); }); customerMock.js:
import mock from "../utils/mock";
mock.onGet("/api/customer/list").reply(200, { customers: [] });
index.js:
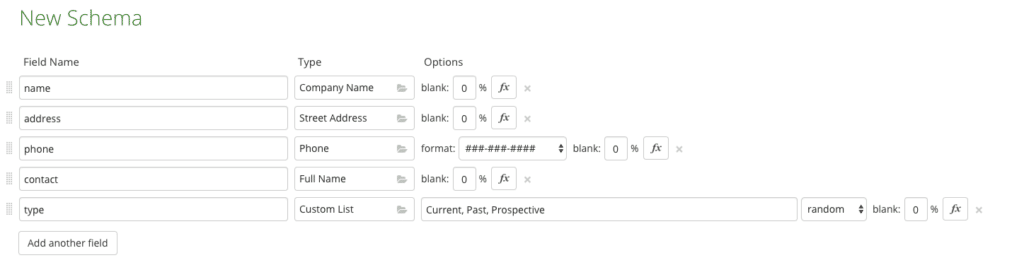
export * from './customerListMock';So now that we have a place for our mock JSON to live, we need to fill it with some information. I searched around for a JSON generator and came across a very useful app called Mockaroo. You can use it to quickly generate large amounts of data using a multitude of different types (dates, numbers, names, etc.) as well as custom lists. Let’s create a schema that matches what we have in our table.
Generate your mock data and copy it into the customerMock.js file. The beginning of your file should look like this:
import mock from '../utils/mock';mock.onGet('/api/customer/list').reply(200, { customers: [{ "name": "Camido", "address": "5041 Evergreen Drive", "phone": "326-635-5900", "contact": "Bobbie Cadge", "type": "Prospective" }, { "name": "Eimbee", "address": "5922 Independence Park", "phone": "721-757-6101", "contact": "Harlin Leimster", "type": "Prospective" },.....Another nice part about Mockaroo is that you can save your schemas so that if there are any additions or changes down the road, you can simply update it and then re-download your JSON information, and you’re only out a few minutes.
Okay, so now we’ve got our mock API in place, let’s bring it into our customer list. First, we need to update our imports to include useEffect and useState, as well as Axios and our mock data location.
import React, { useEffect, useState, forwardRef } from "react"import MaterialTable from 'material-table';import axios from '../utils/axios';import "../mock";Next, we’ll create a state variable for the customer list, and use useEffect to make the call for the sample data. Add the following at the top of your Customers function.
const [customerList, setCustomerList] = useState([]); useEffect(() => { let mounted = true; const fetchData = () => { const apiEndPoint = '/api/customer/list' axios.get(apiEndPoint).then(response => { if (mounted) { setCustomerList(response.data.customers); } }); } fetchData(); return () => { mounted = false; }; }, true);Then, the only thing left to do is replace the “data” prop for the table to use the state variable that’s getting updated in useEffect, and we’ll be all set.
<MaterialTable style= icons={tableIcons} title="Customers" columns={[ { title: 'Name', field: 'name' }, { title: 'Address', field: 'address' }, { title: 'Phone Number', field: 'phone' }, { title: 'Primary Contact', field: 'contact' }, { title: 'Customer Type', field: 'type' }, ]} data={customerList} options= />Now that you have this list up and running, there are a lot of possibilities to grow this functionality from here. For instance, you can set row click actions on the data table to go to a detail page of a customer and use URL variables in routing to bring up the details of each customer.
The great part is that if there are any changes to any of your schemas, or any values within those schemas, it’s just as simple as updating the material table rows, and/or making updates in Mockaroo and regenerating the sample data.
This ended up being a huge timesaver for me and made working with large amounts of dashboard information much less daunting and tedious.